It has been a quest of mine for a few years now to replace as many Software As A Service subscriptions as I can with self-hosted alternatives. Slowly I've been able to reclaim many dollars a month in subscriptions (so long as you ignore the fact that I keep adding new projects that involve new hardware costs). But aside from that, it has also given me better control over my data and the ways I am allowed to use my devices.
A place that has been a regular sticking point of difficulty for me has been music. I think the difficulties around music self-hosting can be broken down into a few parts:
- Acquisition: Reliable high-quality sources of music downloads are relatively few and far between on most public trackers. Even on private trackers, barring the hallowed halls of REDacted, the availability of content is piecemeal at best.
- Quality of Metadata: Much of what you can find has tagging and metadata that is all over the place, making the categories in your library a mess and making music quite difficult to organize nicely.
- Rigidity of Tooling: Many of the tools I have found don't handle finding something without perfect metadata very well or don't have enough sources of metadata to import much of my music library well without tons of manual intervention.
The workflow put together here seeks to at least lessen the pain points for some of these problems so a music library doesn't feel like such a massive chore to deal with. The first problem, acquisition, can be solved in a future post I'm writing on how to set up slskd and hook it into this existing system. (Coming soon promise)
Part 1: Navidrome
Navidrome is a lightweight self-hosted music server that I've found to get rid of several of my pain points with both Jellyfin and Plex's music handling. For one, the database searches are so incredibly snappy. Loading large lists of albums or playlists no longer feels like I am waiting for a dialup connection to establish. Additionally, it provides native listenbrainz or last.fm scrobbling - you only have to put in your user ID key and you're good to go.
While the default webUI for the server leaves something to be desired, the APIs are so fully-featured that there are a large number of clients to try for every platform (including alternative webUIs). So many, in fact, that I would be very surprised if you were not able to find one to your liking. Navidrome servers are compatible with all Navidrome, Subsonic, Madsonic, and Airsonic clients.
In general, I've found Navidrome the easier of the two pieces we're looking at to set up. The docker compose is dead simple, and in general for me it has "just worked".
Here is a boilerplate docker compose file to modify:
services:
  navidrome:
    container_name: navidrome
    image: deluan/navidrome:latest
    user: 1000:1000 # should be owner of volumes
    ports:
      - "4533:4533"
    restart: unless-stopped
    #environment:
volumes:
  - "/path/to/desired/db/location:/data"
  - "/path/to/music/library:/music:ro"
In this compose we:
- Pull the latest version of navidrome using "
image: deluan/navidrome:latest" - Define the user as 1000:1000 - but this should be whatever user UID and GID owns the paths that own the folders the container will be working on in your "real" filesystem
- Expose port 4533 in the container through port 4533 on the real system
- Set the container to attempt to restart after a crash unless manually stopped
- In the most basic of installs, the "environment" section isn't necessary, and if left empty will cause an error, so it is commented out here. That said, there are settings you may want to change that should be done through environment variables. For example, the server time zone for accurate timestamps in logs. The list of the variables, what they can do, and their defaults can be found here.
After you've configured the compose as needed, boot it up using the docker GUI of your choice or using docker compose up -d.
Once it's finished starting, open http://localhost:4533 or the IP of your server at the same port. You will be prompted to create the initial admin account and you can start your first library scan if you have an existing media library.
All done! Now go check out the different client options you have to try out!
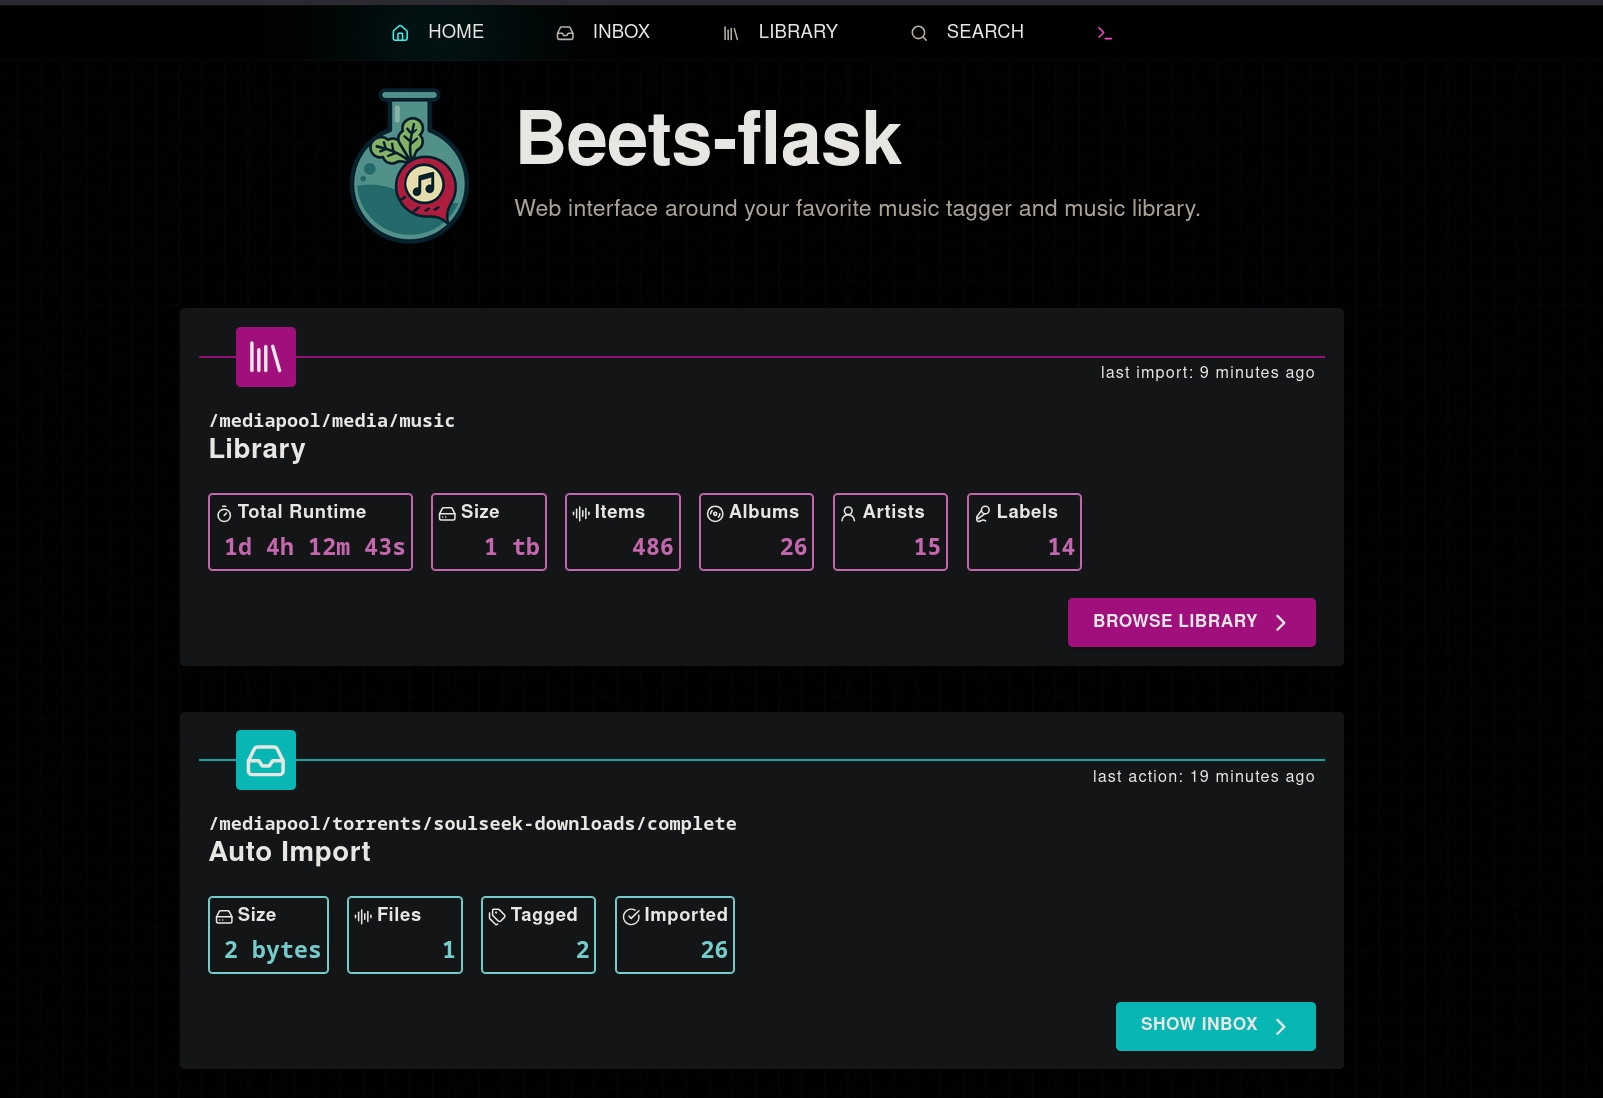
Part 2-A: beets-flask
beets-flask has been my automated solution to be able to have a watched folder that I can drop in music or have my download clients drop in completed music downloads and have beets take care of scanning the album, finding a matching release on musicbrainz, then applying consistent tagging and moving it into my music library. This automates the vast majority of the headache that exists when setting up and managing a music library.
As always with me, we'll be setting it up with docker-compose. Here is a compose file to start with:
beets-flask:
      image: pspitzner/beets-flask:stable
      container_name: beets
      restart: unless-stopped
      ports:
          - 5026:5001
      environment:
          # 502 is default on macos, 1000 on linux
          TZ: Etc/UTC
          USER_ID: 1000
          GROUP_ID: 1000
      volumes:
          - /path/to/configs/beets-flask:/config
          # for music folders, match paths inside and out of container!
          - /path/to/ingest/folder:/path/to/ingest/folder
          - /path/to/media/library:/path/to/media/library
To break down what we've done:
image: pspitzner/beets-flask:stable: Grab the stable release channel of the beets-flask docker containercontainer_name: beets: names our container "beets" in the docker daemonrestart: unless-stopped: restarts the container if it crashes unless you have manually stopped it- Under ports we have set 5026 for the port on the "real" machine, and we have bound port 5001 in our virtual "container machine". The 5001 part inside the container is mandatory- the physical port you bind the webui to can be anything you like
TZ: Etc/UTC: sets our container's timezone to one that matches your timezone. You can use the TZ database to identify which code you should use for yours.- USER_ID and GROUP_ID: these should be set to whatever user and group ID own the files that beets will be interacting with. In my case that is 1000:1000.
Under volumes, we have three bindmounts. If you want to have more you can, this is just the minimum I would recommend.
- Our first bindmount sets the folder where beets and beets-flask will be saving their configs.
- For music folders, you want to make sure that the folder structure inside the container matches the folder structure on the outside. So if your media library is in
/home/user/Music, your bind mount should be/home/user/Music:/home/user/Music.
Now, we need to start the container. Your log will throw a million errors, but that's fine. We only need to run it for 10 seconds or so while it makes all of our config files in the directories we set. Once you've given it a few seconds, stop them all either with your GUI or with docker compose down.
Part 2-B: beets & beets-flask configuration
beets config
Now that we've generated our files, head over to wherever you mapped the /config directory to and you should see two folders: beets and beets-flask.
First, we're going to head into beets and open config.yaml using your favourite text editor or by using nano config.yaml in the command line.
Initially, you'll land on your "plugins" field. This can mostly be left alone, but make sure you put a # in front of the line for spotify unless you intend to set it up, as this requires authentication and will cause problems if unauthenticated and enabled. Your plugins should look something like this afterwards:
plugins: [
        info,
        the,
        fetchart,
        embedart,
        ftintitle,
        lastgenre,
        missing,
        albumtypes,
        scrub,
        zero,
        mbsync,
        duplicates,
        convert,
        fromfilename,
        inline,
        edit,
       # spotify, # needs authentication https://docs.beets.io/en/latest/plugins/spotify.html
        musicbrainz # needs to be enabled explicitly since beets 2.4.0
    ]
Next, for the directory: field, you should set this to the mapping for your media library. If we were using my demo compose from above, we would make this value:
directory: /path/to/media/library
In the import: section, leave things mostly as is- "move" set to no, and write and copy set to yes. While beets on its own supports just straight moving the files, beets-flask supports only copy and undo + a separate cleanup task.
You can also set the save path of your import logs, I like to put mine in the config directory but you can set this to what you like. Keep in mind though, this should be set to whatever directory is setup inside the container. If I wanted to put it in the config folder based on my compose file above it would be log: /config.
Lastly, in the import section you can also set what actions beets will take if the file being imported is a duplicate. A breakdown of the options can be found here.
Now you can scroll down to the section labelled musicbrainz:. Modify it to look something like this:
musicbrainz:
    user: "musicbrainz_username"
    pass: "musicbrainz_password"
    searchlimit: 20
    extra_tags:
      [
      catalognum,
      country,
      label,
      media,
      year
      ]
    external_ids:
        discogs: yes
        bandcamp: yes
        spotify: yes
        deezer: yes
        beatport: yes
        tidal: yes
The musicbrainz username and password are relatively obvious, but this should be your credentials for musicbrainz. If you don't have an account, make one for free- it helps with rate limiting as well as if you ever need to upload some of your own metadata to the DB.
You can also optionally add additional metadata sources if you so desire. To do so, check the list of plugins found here. You just need to add the plugin you want to use into the "plugins" section from above, for example here I have added deezer:
plugins: [
        info,
        the,
        fetchart,
        embedart,
        ftintitle,
        lastgenre,
        missing,
        albumtypes,
        scrub,
        zero,
        mbsync,
        duplicates,
        convert,
        fromfilename,
        inline,
        edit,
       # spotify, # needs authentication https://docs.beets.io/en/latest/plugins/spotify.html
        musicbrainz,
        deezer
    ]
Then, all that needs to be done is configuring that plugin. Any specific configuration needed for a given plugin can be found at the list of plugins linked above.
Here is an example of my deezer metadata configuration, which would be put in the same column as the musicbrainz configuration we just did, either above or below it:
deezer:
    search_query_ascii: no
    data_source_mismatch_penalty: 0.5
    search_limit: 20
Now we can save and close this specific config.yaml.
beets-flask config
Now we need to go into the beets-flask folder that we didn't go into earlier in our config directory. In here, there will be a second config.yaml. Open this with your tool of choice and we'll be making some changes.
The first thing to set is under terminal: - beets-flask gives you the option to hop into a GUI from the terminal and use any of the regular CLI commands that beets offers. This variable sets the directory that you start in when you jump into the CLI.
Next, we want to modify a few things right below it in the inbox: field:
debounce_before_autotag: This sets the number of seconds that a folder needs to remain unchanged before it will begin attempting to scan and tag it (in an intake folder that is set to automatic). This can be helpful if you are dealing with slower file transfers or downloads and don't want it trying to scan half-assembled albums
Under folders we have several "inboxes". These are watched folders that we can set to automatiaclly tag and import, automatically tag and not import, or have the tagging be fully manual and needing to be triggered via GUI or CLI. Here is an example inbox, and I'll explain the variables below.
Inbox1:
                name: "Auto Import"
                path: "/path/to/ingest/folder"
                autotag: "auto"
                auto_threshold: null
- The name part is relatively self explanatory, this will be what the inbox is called in the GUI.
path:should be the folder that the watchdog will be keeping a look at, and in this case is the one that we bound in our docker compose.autotag:can be set to four different values:nowill make tagging not trigger automatically nor will importing trigger automatically. All must be manually executed via CLI or GUI."preview"will automatically trigger scanning and tagging but will not automatically import"auto"will automatically trigger scanning and tagging, and will import automatically if it is a close enough match to the release found on listenbrainz (will explain how to set this threshold in a minute)"bootleg"assumes the correct metadata cannot be found on the internet and trusts the existing data from the files- only groups the albums and imports automatically
auto_threshold:sets how close to a perfect match something has to be for the inbox to automatically import. By default (or if left "null") this will require a 90% match to automatically import. To change this, use a decimal representation of the remaining percentage between your desired value and 100%. For example: if you want it to require a 90% match, you would set this to 0.1. For an 80% match, 0.2, etc.
Now we can save and close this config.yaml as well.
Part 3: Importing
You should now be able to boot into the Web GUI and move over to the "Inbox" section. Note- the "Library" section in beets-flask will only show music you have imported using beets-flask. Existing media won't show in the "library" section, this primarily exists to give you the ability to undo if necessary.
You can watch it work on files, it will tell you where it got the metadata from as well as how confident it is in the match. From there you can either manually scan & select the releases, or you can let the debounce clock run out and it will import anything over your matching threshold on its own.
My only real gripe with this setup is it is not well suited to just throwing your library at it, as beets-flask focuses on copying files into place so that the import can be undone if necessary (and as far as I'm aware this is the case regardless of what you set beets to do re: copy/move/write). For processing an existing library, I would move batches of folders into the inbox and let them process before deleting what is left over in the inbox. This does result in a temporary duplication of the files, but barring using the beets CLI or using something like Picard to tag in-situ this is the best method I've thought of.
Going forwards though, all new downloads into your music library can be dropped in the watch folder and automatically tagged and imported. If popping into the GUI once in a while and deleting the already imported items with a single click is too much for you, a cronjob can easily be set up on most systems to wipe your input directory at a set time each day or every x minutes.
That's it for now!
As of right now I'm tired of writing. A part 2 is on the way where I'll break down setting up slskd and adding it into this setup, and I may come back and clean up/expand on some points I think of any gaps in my explanation or any are pointed out to me.
If you have questions, feel free to drop by my support Signal room - otherwise, stay tuned!